

Track Creator 101 (Kinda Useless or Kinda Usefull advices, recomendations and stuff that you can add in your tracks)

Page: 1
 67715 pts ★ Titan
 13015 pts ★ Champion
On 2023-12-06 at 22:23:21
Well keep in mind this:
- English isn't my native languaje so i apologize in advance for any inconvenience caused by some misunderstanding in my messages in the worst case.
- I won't do a french translation because... i think that you'all can easily figure out that i speak sapish(spanish) and i haven't take any kind of french lessons yet so...
- I won't teach any kind of ""right or perfect"" way to make tracks, this will be more a kind of advices, recomendations and some than other stuff based on my own criteria so i won't force you to follow my methods.
- If you'll just critize my methods because you have better ways to do it, feel free to create your own topic and share your knowledge (F.U with much affection and well-deserved respect)
- Keep in mind that i just use paint.net, so im not sure how can be used or how are named some tools or effects in others softwares.
- As almost every tutorial in the world, i'm gonna start with the basic so that overtime i can introduce properly or in a more understable way some advance stuff (or a least something that i consider as such)
- With my activity on the site isn't the best so is kinda rare to see me very active at forums, so you can guess that i won't do a daily message explaining something, i think that basically will be just like 10 messages or idk.
Said that.... Time to start with some basic stuff........
Well obviusly every track starts with that.... a least mines start with making the layout, so the layout desing will ups in your creativity xd i'll just want to give this poins to take in consideration:
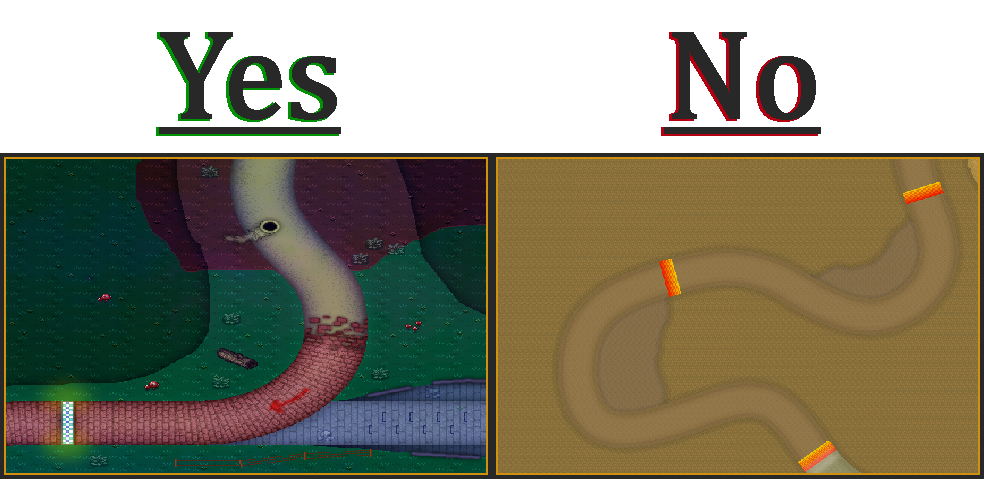
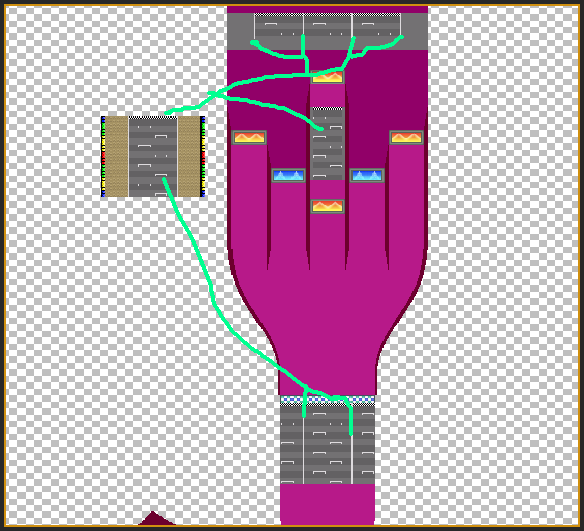
1- Readbility: What i mean with this? Well, the track will be a mess if the layout just get lost in the background or in a big amount of useless details because the main road will be hard to see, so always try to keep pretty clear the limits of the drivable part, of the one which is only decorative. Here an example:
Even if the layout has no drawn walls, you can do an outline or make the outside a bit darker, highlighting the main layout.
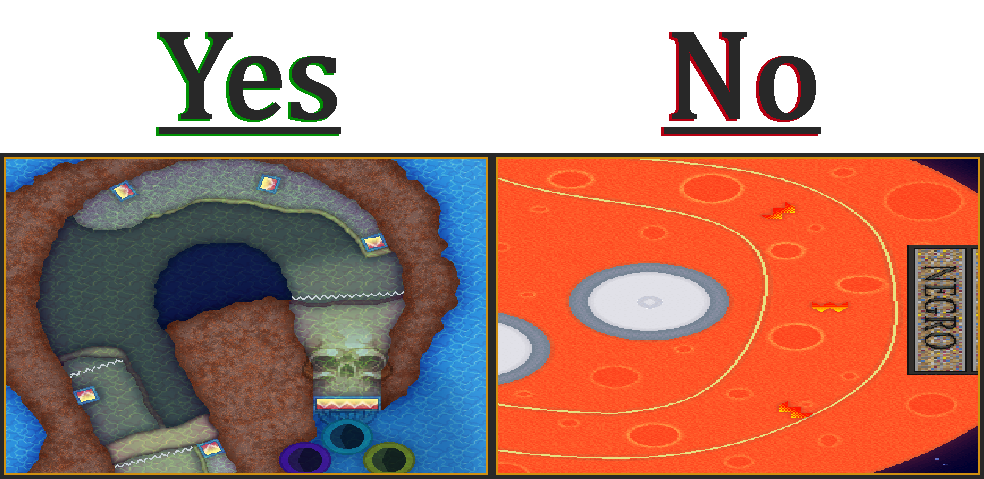
2- Keeping Clear the main elements: Jumps, boost pannels, offroad, holes, those elements that i mentioned (specially the jumps that i highlighted lol), needs to be pretty noticeable in the track, always try to dont blend them with the track, even these "hidden" ones that could help in shortcuts, doesnt need to be pretty hidden or almost unoticeables. Here some examples:
As separated, some examples for the jumps.... Why a separated example?, well because keep in mind this is a flat game, so some kind of sursprise jumps such like the ones of mobile floor like in wii bowser castle works good in 3d (not really but you'all get it) because there's a kind of anticipation due is a 3d model so you can see everything better, meanwhile in 2d... well to keep it short, just make every jump pretty noticiable DONT MAKE INVISIBLE JUMPS... please
Extra tip: try to keep a kind of patter to boost and jump pannels so people that already played your tracks can figure out better any element (as example and totally not propaganda lol, you can see that in almost all my tracks i keep a main desing for boost pannels and all that kind of stuff.)
3- Size and creativity of the layout: Size does matter!..... and yep i'm still talking about tracks (totally intentional out of context lol), Something a bit hard to master at the beggining but after mastering it, is pretty easy, keep in mind that if you want to make some W I D E patch or narrow ones, you have to test them in mkpc to see if it plays well, a tip for this is that you can take measurements on the basis of already done tracks, so you can already figure out how will be that W I D E or narrow part in your track. Examples:
Now about the creativity of the layout, yep is nice that you can create a layout different to the others, but in some cases, try to dont exagerate with the""creativity""here some examples:
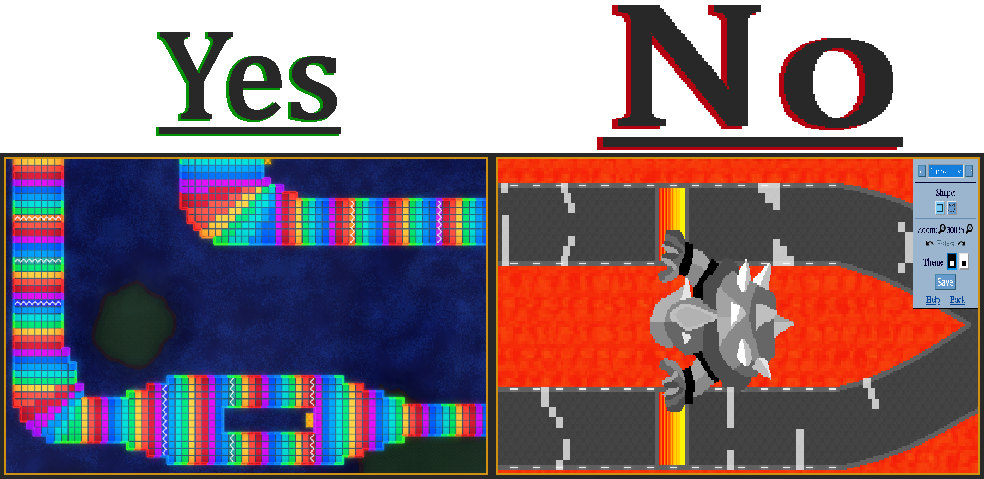
When a turn is pretty... hard to take, just try to tour-ify that turn. You can guess that i'll show some examples lol
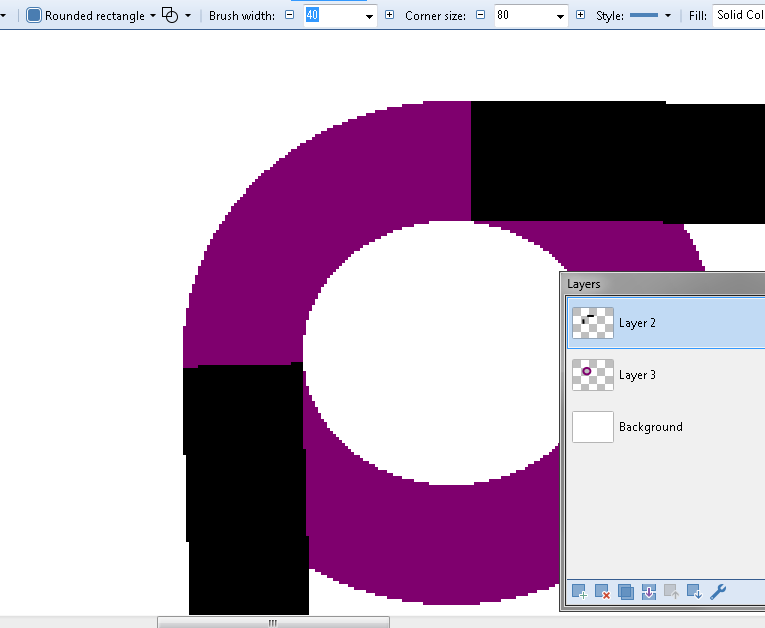
Tip (a least in paint.net): DONT use the circle tool to make curves, use rounded rectangle instead. No i'm not crazy (yet), you can do better shaped circles with rounded rectangle tool and works better than elipse in short or small corners, just set the corner size with a pretty high number and do a circle just like with elipse tool see this image to notice the differences:
Even if it's a bit unoticeable, is pretty obvius that with rounded circle the turns will be better, obviously i do them in a new layer to don't mess so much the main layout:
Having explained all this, which I consider basic knowledge, for the next time i'll go ahead and explain about using layers, soooo see ya next time!!!
- English isn't my native languaje so i apologize in advance for any inconvenience caused by some misunderstanding in my messages in the worst case.
- I won't do a french translation because... i think that you'all can easily figure out that i speak sapish(spanish) and i haven't take any kind of french lessons yet so...
- I won't teach any kind of ""right or perfect"" way to make tracks, this will be more a kind of advices, recomendations and some than other stuff based on my own criteria so i won't force you to follow my methods.
- If you'll just critize my methods because you have better ways to do it, feel free to create your own topic and share your knowledge (F.U with much affection and well-deserved respect)
- Keep in mind that i just use paint.net, so im not sure how can be used or how are named some tools or effects in others softwares.
- As almost every tutorial in the world, i'm gonna start with the basic so that overtime i can introduce properly or in a more understable way some advance stuff (or a least something that i consider as such)
- With my activity on the site isn't the best so is kinda rare to see me very active at forums, so you can guess that i won't do a daily message explaining something, i think that basically will be just like 10 messages or idk.
Said that.... Time to start with some basic stuff........
The layout
Well obviusly every track starts with that.... a least mines start with making the layout, so the layout desing will ups in your creativity xd i'll just want to give this poins to take in consideration:
1- Readbility: What i mean with this? Well, the track will be a mess if the layout just get lost in the background or in a big amount of useless details because the main road will be hard to see, so always try to keep pretty clear the limits of the drivable part, of the one which is only decorative. Here an example:
Even if the layout has no drawn walls, you can do an outline or make the outside a bit darker, highlighting the main layout.
2- Keeping Clear the main elements: Jumps, boost pannels, offroad, holes, those elements that i mentioned (specially the jumps that i highlighted lol), needs to be pretty noticeable in the track, always try to dont blend them with the track, even these "hidden" ones that could help in shortcuts, doesnt need to be pretty hidden or almost unoticeables. Here some examples:
As separated, some examples for the jumps.... Why a separated example?, well because keep in mind this is a flat game, so some kind of sursprise jumps such like the ones of mobile floor like in wii bowser castle works good in 3d (not really but you'all get it) because there's a kind of anticipation due is a 3d model so you can see everything better, meanwhile in 2d... well to keep it short, just make every jump pretty noticiable DONT MAKE INVISIBLE JUMPS... please
Extra tip: try to keep a kind of patter to boost and jump pannels so people that already played your tracks can figure out better any element (as example and totally not propaganda lol, you can see that in almost all my tracks i keep a main desing for boost pannels and all that kind of stuff.)
3- Size and creativity of the layout: Size does matter!..... and yep i'm still talking about tracks (totally intentional out of context lol), Something a bit hard to master at the beggining but after mastering it, is pretty easy, keep in mind that if you want to make some W I D E patch or narrow ones, you have to test them in mkpc to see if it plays well, a tip for this is that you can take measurements on the basis of already done tracks, so you can already figure out how will be that W I D E or narrow part in your track. Examples:
Now about the creativity of the layout, yep is nice that you can create a layout different to the others, but in some cases, try to dont exagerate with the""creativity""here some examples:
When a turn is pretty... hard to take, just try to tour-ify that turn. You can guess that i'll show some examples lol

Tip (a least in paint.net): DONT use the circle tool to make curves, use rounded rectangle instead. No i'm not crazy (yet), you can do better shaped circles with rounded rectangle tool and works better than elipse in short or small corners, just set the corner size with a pretty high number and do a circle just like with elipse tool see this image to notice the differences:

Even if it's a bit unoticeable, is pretty obvius that with rounded circle the turns will be better, obviously i do them in a new layer to don't mess so much the main layout:
Having explained all this, which I consider basic knowledge, for the next time i'll go ahead and explain about using layers, soooo see ya next time!!!
 8
8 5
5 5
5 1
1On 2023-12-06 at 22:24:28
First and good explaining example.
 1
1On 2023-12-07 at 18:08:09
Good tips.
I create pixel tracks in Pixel Studio because it's not heavy
I create pixel tracks in Pixel Studio because it's not heavy
2 2
2On 2023-12-08 at 19:40:27
Ayo i'm back so, time for the next ... basically lesson xd
Probably my favorite tool of almost any painting software, but what makes layers so good ? you may wonder, well layers funtion is simple, when you create one and have it selected they allow you to draw above or below the canvas depending on the order in which you put them; it also lets you set the opacity of each layer, letting you fade or intensify whatever is in that layer, brings the easy option of enable or disable a layer so you can see how works something without that layer, and something pretty important for future stuff, the blending mode of the layer.
So basic stuff to know about layers (how to create one and its elements)
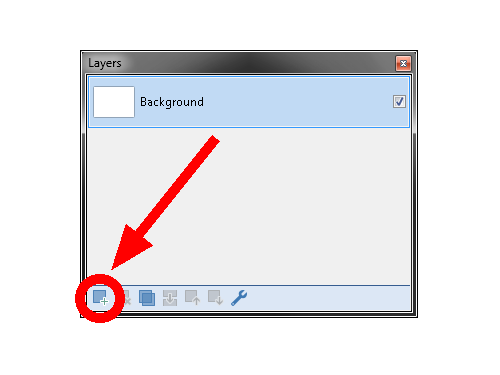
A-) Click Add New Layer to add as many layers as you want. The background layer is the default layer you will see every time you start a new project unless you make changes in the Settings area.
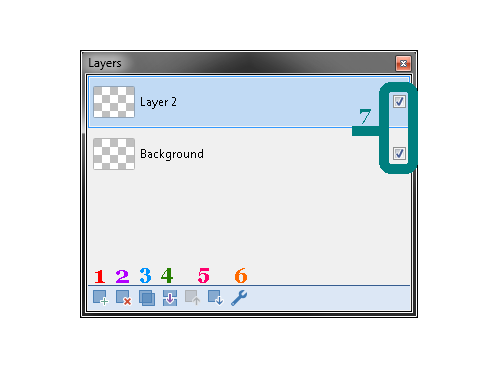
B-) You can see these options that i number:
1- New Layer : kinda stupid that i explain what it does, but well you can guess that option lets you add a new layer how many times you want
2- Delete Layer: Doing the contrary to the first option, this one lets you delete every layer that you have selected.
3- Duplicate Layer: This option lets you duplicate the layer that you have selected.
4- Merge Layer Down: With this option, you can combine the layer you have selected with the one below it.
5- Move Up/Down Layers: As it's name says, this option is used to up or down the layer that you have selected.
Basically Shortcut: You can also move layers by just clicking and dragging it with the mouse.
6- Layer Settings: Clicking on this option, you can set some options suck as Layer Opacity, Blend Mode, Name of the Layer, Enable/Disable layer and anything else that i might be forgetting.
7- Enable/Disable Layers: Basically a shortcut to Enable/Disable layers with just one click (this sound like a slogan for propaganda lmao).
C-) If you save the project without flatten the layers, the software (a least the ones that i used) will save the track as another project, on my case paint.net saves projects with layers as .pdn files being able to open only with paint.net, shall i worry about it? Nah is common so don't worry, to save the whole project as image format, just click on "Save As" and instead pick the image format of your prefference, probably it'll ask you if you want to flatten the layers, by logic you'll click yes. Another way is just... flatten everything before saving (look for the option in your software, in case of using paint.net the shortcut is CTRL + Shift + F):gamba: .
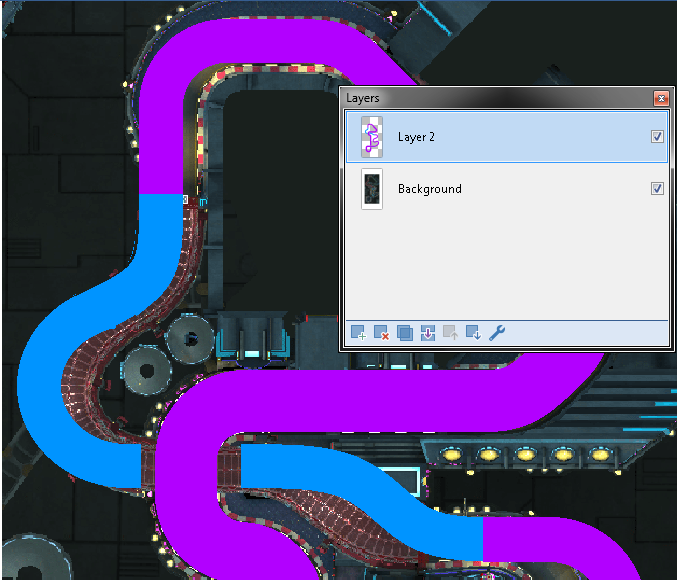
- Tracing an existing layout: Easily with layers, you can replicate any part of any existing track with just putting it's map in a layer below your main layout.
Example:
- Create a layout variant without affecting the original layout: sounds a bit confusing but lemme explain with images:
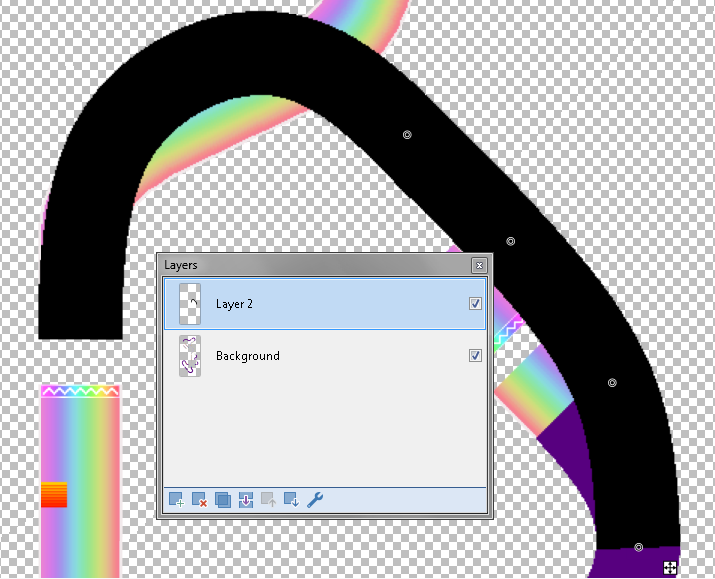
As you can see, with layers i easily can have a kind of preview of how will look something before merge the layers.
- Edit something without affect the main layout: as you can guess, layers can help you to work in details without affecting the main layout, i mean that you can erase something that goes through the layout but if it's in another layer, the layout won't be affected.
Example:
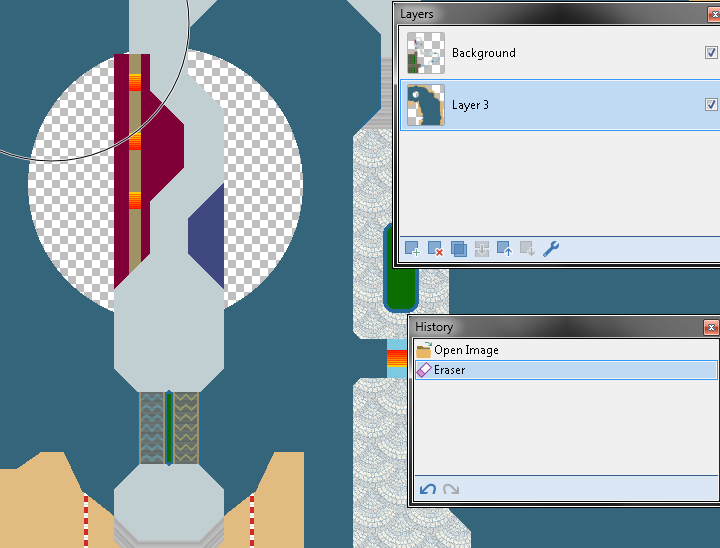
As you can see, i deleted part of the background without deleting the main layout thanks to separated both in layers before.
- Visual Effects: There's a lot of ways to do visual effects, like shades, higlightings, fading textures to simulate tunnels or going inside something, glows, etc, the only limit is your imagination...... and your skill using the software of course :gamba: .
Example:
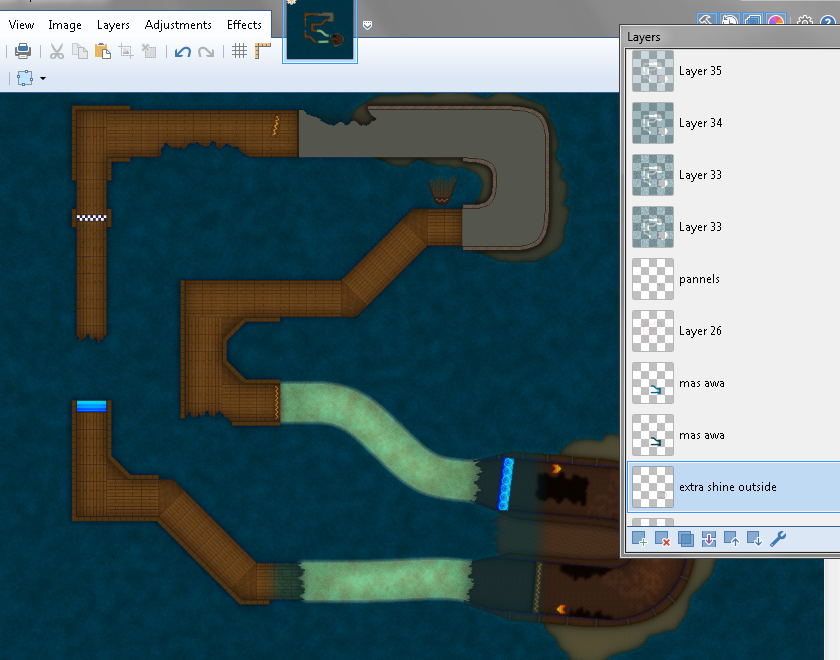 i always have a big amount of layers in each track, because i add an effect or texture and try to polish it at best, sometimes is funny to do and sometimes is a hard headache :gamba:
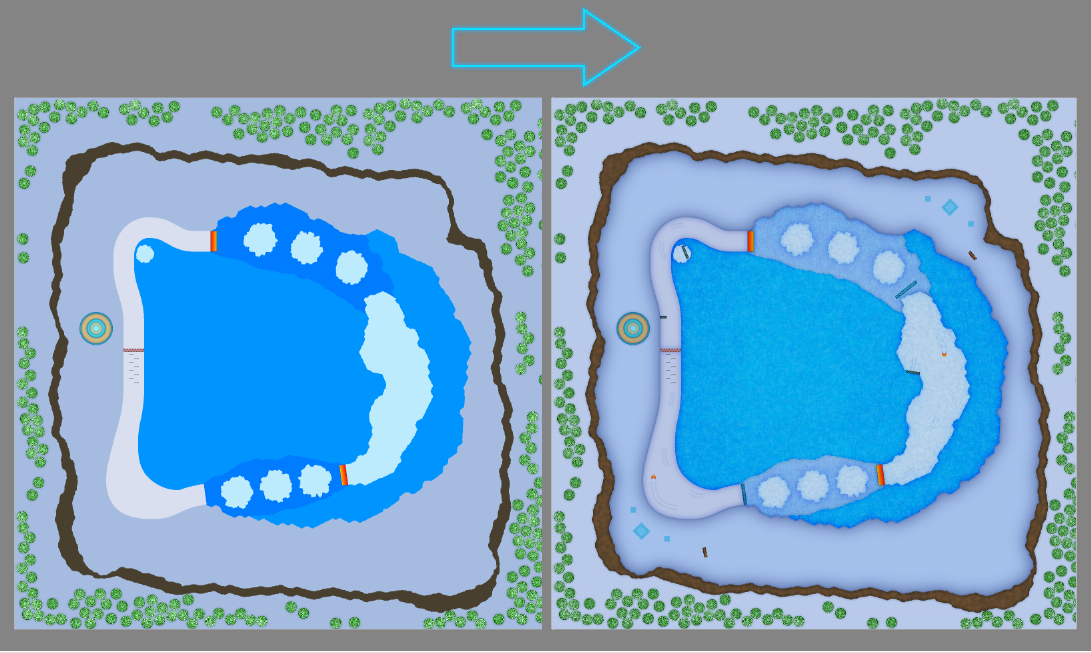
- Texturing: There's a lot of ways to make textures too, and with layers you can apply them in a easier way; on the next time i'll go ahead and explain some methods that i use to aply textures anyways, because with texturing a track, it can have a noticeable change in a good way, as you can see here:
In short, after you learn how to use layers, easily you'll be able to improve your tracks so dont fear and learn how to use them, in summary of the summary, God Gamba Bless Layers and for the next time, i'll show you some ways to add textures for you track.
Layers
Probably my favorite tool of almost any painting software, but what makes layers so good ? you may wonder, well layers funtion is simple, when you create one and have it selected they allow you to draw above or below the canvas depending on the order in which you put them; it also lets you set the opacity of each layer, letting you fade or intensify whatever is in that layer, brings the easy option of enable or disable a layer so you can see how works something without that layer, and something pretty important for future stuff, the blending mode of the layer.
Soooo something that i could tell you, is that my tracks are like onions by the amount of layers that i use (original quote by tox lol), i mean not every track will need this amount of layers, is just that im pretty meticulous lol.
So basic stuff to know about layers (how to create one and its elements)
A-) Click Add New Layer to add as many layers as you want. The background layer is the default layer you will see every time you start a new project unless you make changes in the Settings area.
B-) You can see these options that i number:
1- New Layer : kinda stupid that i explain what it does, but well you can guess that option lets you add a new layer how many times you want
2- Delete Layer: Doing the contrary to the first option, this one lets you delete every layer that you have selected.
3- Duplicate Layer: This option lets you duplicate the layer that you have selected.
4- Merge Layer Down: With this option, you can combine the layer you have selected with the one below it.
5- Move Up/Down Layers: As it's name says, this option is used to up or down the layer that you have selected.
Basically Shortcut: You can also move layers by just clicking and dragging it with the mouse.
6- Layer Settings: Clicking on this option, you can set some options suck as Layer Opacity, Blend Mode, Name of the Layer, Enable/Disable layer and anything else that i might be forgetting.
7- Enable/Disable Layers: Basically a shortcut to Enable/Disable layers with just one click (this sound like a slogan for propaganda lmao).
C-) If you save the project without flatten the layers, the software (a least the ones that i used) will save the track as another project, on my case paint.net saves projects with layers as .pdn files being able to open only with paint.net, shall i worry about it? Nah is common so don't worry, to save the whole project as image format, just click on "Save As" and instead pick the image format of your prefference, probably it'll ask you if you want to flatten the layers, by logic you'll click yes. Another way is just... flatten everything before saving (look for the option in your software, in case of using paint.net the shortcut is CTRL + Shift + F):gamba: .
Some examples where layers can be very useful:
- Tracing an existing layout: Easily with layers, you can replicate any part of any existing track with just putting it's map in a layer below your main layout.
Example:
- Create a layout variant without affecting the original layout: sounds a bit confusing but lemme explain with images:
As you can see, with layers i easily can have a kind of preview of how will look something before merge the layers.
- Edit something without affect the main layout: as you can guess, layers can help you to work in details without affecting the main layout, i mean that you can erase something that goes through the layout but if it's in another layer, the layout won't be affected.
Example:
As you can see, i deleted part of the background without deleting the main layout thanks to separated both in layers before.
- Visual Effects: There's a lot of ways to do visual effects, like shades, higlightings, fading textures to simulate tunnels or going inside something, glows, etc, the only limit is your imagination...... and your skill using the software of course :gamba: .
Example:
i always have a big amount of layers in each track, because i add an effect or texture and try to polish it at best, sometimes is funny to do and sometimes is a hard headache :gamba:- Texturing: There's a lot of ways to make textures too, and with layers you can apply them in a easier way; on the next time i'll go ahead and explain some methods that i use to aply textures anyways, because with texturing a track, it can have a noticeable change in a good way, as you can see here:
In short, after you learn how to use layers, easily you'll be able to improve your tracks so dont fear and learn how to use them, in summary of the summary, God Gamba Bless Layers and for the next time, i'll show you some ways to add textures for you track.
33On 2023-12-08 at 21:00:58
You're like those strict bitchfacish teachers who share their knowledge because they've got a lotta experience... without the strict bitchfacish part
Nah but tbh, thank you
Nah but tbh, thank you
1On 2023-12-14 at 15:06:54
Ayo i'm back so, time for the next ... basically lesson xd
Probably my favorite tool of almost any painting software, but what makes layers so good ? you may wonder, well layers funtion is simple, when you create one and have it selected they allow you to draw above or below the canvas depending on the order in which you put them; it also lets you set the opacity of each layer, letting you fade or intensify whatever is in that layer, brings the easy option of enable or disable a layer so you can see how works something without that layer, and something pretty important for future stuff, the blending mode of the layer.
So basic stuff to know about layers (how to create one and its elements)
A-) Click Add New Layer to add as many layers as you want. The background layer is the default layer you will see every time you start a new project unless you make changes in the Settings area.
B-) You can see these options that i number:
1- New Layer : kinda stupid that i explain what it does, but well you can guess that option lets you add a new layer how many times you want
2- Delete Layer: Doing the contrary to the first option, this one lets you delete every layer that you have selected.
3- Duplicate Layer: This option lets you duplicate the layer that you have selected.
4- Merge Layer Down: With this option, you can combine the layer you have selected with the one below it.
5- Move Up/Down Layers: As it's name says, this option is used to up or down the layer that you have selected.
Basically Shortcut: You can also move layers by just clicking and dragging it with the mouse.
6- Layer Settings: Clicking on this option, you can set some options suck as Layer Opacity, Blend Mode, Name of the Layer, Enable/Disable layer and anything else that i might be forgetting.
7- Enable/Disable Layers: Basically a shortcut to Enable/Disable layers with just one click (this sound like a slogan for propaganda lmao).
C-) If you save the project without flatten the layers, the software (a least the ones that i used) will save the track as another project, on my case paint.net saves projects with layers as .pdn files being able to open only with paint.net, shall i worry about it? Nah is common so don't worry, to save the whole project as image format, just click on "Save As" and instead pick the image format of your prefference, probably it'll ask you if you want to flatten the layers, by logic you'll click yes. Another way is just... flatten everything before saving (look for the option in your software, in case of using paint.net the shortcut is CTRL + Shift + F):gamba: .
- Tracing an existing layout: Easily with layers, you can replicate any part of any existing track with just putting it's map in a layer below your main layout.
Example:
- Create a layout variant without affecting the original layout: sounds a bit confusing but lemme explain with images:
As you can see, with layers i easily can have a kind of preview of how will look something before merge the layers.
- Edit something without affect the main layout: as you can guess, layers can help you to work in details without affecting the main layout, i mean that you can erase something that goes through the layout but if it's in another layer, the layout won't be affected.
Example:
As you can see, i deleted part of the background without deleting the main layout thanks to separated both in layers before.
- Visual Effects: There's a lot of ways to do visual effects, like shades, higlightings, fading textures to simulate tunnels or going inside something, glows, etc, the only limit is your imagination...... and your skill using the software of course :gamba: .
Example:
i always have a big amount of layers in each track, because i add an effect or texture and try to polish it at best, sometimes is funny to do and sometimes is a hard headache :gamba:
- Texturing: There's a lot of ways to make textures too, and with layers you can apply them in a easier way; on the next time i'll go ahead and explain some methods that i use to aply textures anyways, because with texturing a track, it can have a noticeable change in a good way, as you can see here:
In short, after you learn how to use layers, easily you'll be able to improve your tracks so dont fear and learn how to use them, in summary of the summary, God Gamba Bless Layers and for the next time, i'll show you some ways to add textures for you track.
Layers
Probably my favorite tool of almost any painting software, but what makes layers so good ? you may wonder, well layers funtion is simple, when you create one and have it selected they allow you to draw above or below the canvas depending on the order in which you put them; it also lets you set the opacity of each layer, letting you fade or intensify whatever is in that layer, brings the easy option of enable or disable a layer so you can see how works something without that layer, and something pretty important for future stuff, the blending mode of the layer.
Soooo something that i could tell you, is that my tracks are like onions by the amount of layers that i use (original quote by tox lol), i mean not every track will need this amount of layers, is just that im pretty meticulous lol.
So basic stuff to know about layers (how to create one and its elements)
A-) Click Add New Layer to add as many layers as you want. The background layer is the default layer you will see every time you start a new project unless you make changes in the Settings area.
B-) You can see these options that i number:
1- New Layer : kinda stupid that i explain what it does, but well you can guess that option lets you add a new layer how many times you want
2- Delete Layer: Doing the contrary to the first option, this one lets you delete every layer that you have selected.
3- Duplicate Layer: This option lets you duplicate the layer that you have selected.
4- Merge Layer Down: With this option, you can combine the layer you have selected with the one below it.
5- Move Up/Down Layers: As it's name says, this option is used to up or down the layer that you have selected.
Basically Shortcut: You can also move layers by just clicking and dragging it with the mouse.
6- Layer Settings: Clicking on this option, you can set some options suck as Layer Opacity, Blend Mode, Name of the Layer, Enable/Disable layer and anything else that i might be forgetting.
7- Enable/Disable Layers: Basically a shortcut to Enable/Disable layers with just one click (this sound like a slogan for propaganda lmao).
C-) If you save the project without flatten the layers, the software (a least the ones that i used) will save the track as another project, on my case paint.net saves projects with layers as .pdn files being able to open only with paint.net, shall i worry about it? Nah is common so don't worry, to save the whole project as image format, just click on "Save As" and instead pick the image format of your prefference, probably it'll ask you if you want to flatten the layers, by logic you'll click yes. Another way is just... flatten everything before saving (look for the option in your software, in case of using paint.net the shortcut is CTRL + Shift + F):gamba: .
Some examples where layers can be very useful:
- Tracing an existing layout: Easily with layers, you can replicate any part of any existing track with just putting it's map in a layer below your main layout.
Example:
- Create a layout variant without affecting the original layout: sounds a bit confusing but lemme explain with images:
As you can see, with layers i easily can have a kind of preview of how will look something before merge the layers.
- Edit something without affect the main layout: as you can guess, layers can help you to work in details without affecting the main layout, i mean that you can erase something that goes through the layout but if it's in another layer, the layout won't be affected.
Example:
As you can see, i deleted part of the background without deleting the main layout thanks to separated both in layers before.
- Visual Effects: There's a lot of ways to do visual effects, like shades, higlightings, fading textures to simulate tunnels or going inside something, glows, etc, the only limit is your imagination...... and your skill using the software of course :gamba: .
Example:
i always have a big amount of layers in each track, because i add an effect or texture and try to polish it at best, sometimes is funny to do and sometimes is a hard headache :gamba:- Texturing: There's a lot of ways to make textures too, and with layers you can apply them in a easier way; on the next time i'll go ahead and explain some methods that i use to aply textures anyways, because with texturing a track, it can have a noticeable change in a good way, as you can see here:
In short, after you learn how to use layers, easily you'll be able to improve your tracks so dont fear and learn how to use them, in summary of the summary, God Gamba Bless Layers and for the next time, i'll show you some ways to add textures for you track.
Perfect for my track about ogres...
 1
1On 2024-01-02 at 23:36:37
First of all... Happy New Year qlonas :gamba:, second yep its been a while but lets say that i forget for a while that i did this topic lmao... now yep lets go
My favorite part of making tracks, texturing helps to define the idea that you have for any part of the track, making clear the kind of texture that the element has, obviously not everything will have the same texture and blah blah blah lets go to the point, today i'm gonna show some ways that i use for do textures
A- Using Confetti + Fragment Blur effect:
The first way that i learned to do textures, even if its a bit outdated, i still using it sometimes and it works really good when you learn how to use it correctly. So let me explain step by step how to do it.
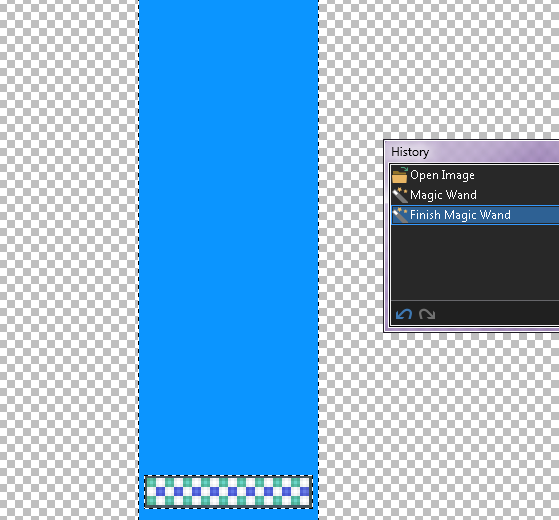
1- Selecting the part where you'll apply the texture, easily you can use the magic wand tool and select it doing click on the zone.
Extra: if you need to select multiples zones you can selec the "add" section and each click that you just keep pressed control when you click.
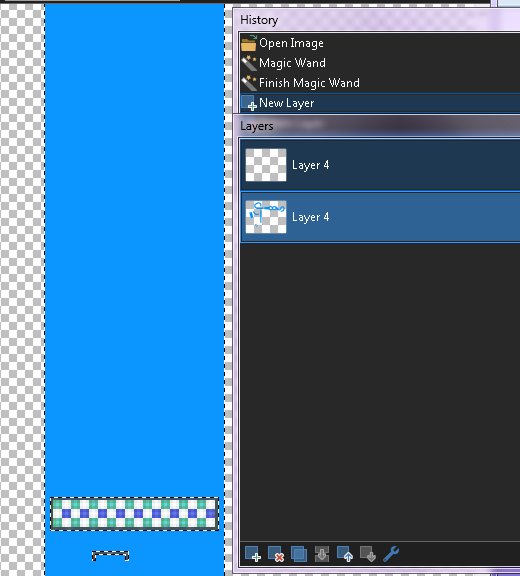
2- Create a new layer WITHOUT end the selection btw.
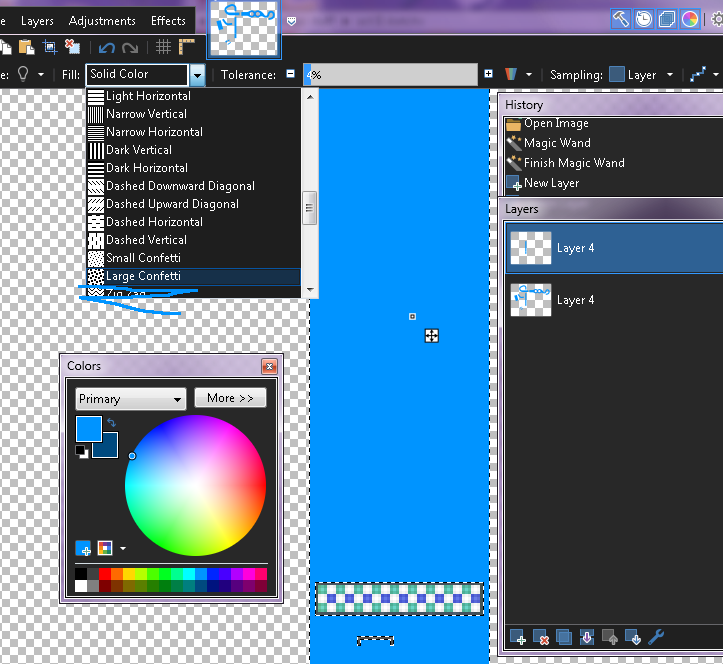
3- Pick the base color of the place where you'll add the texture and pick as secondary color a darker tone of that one
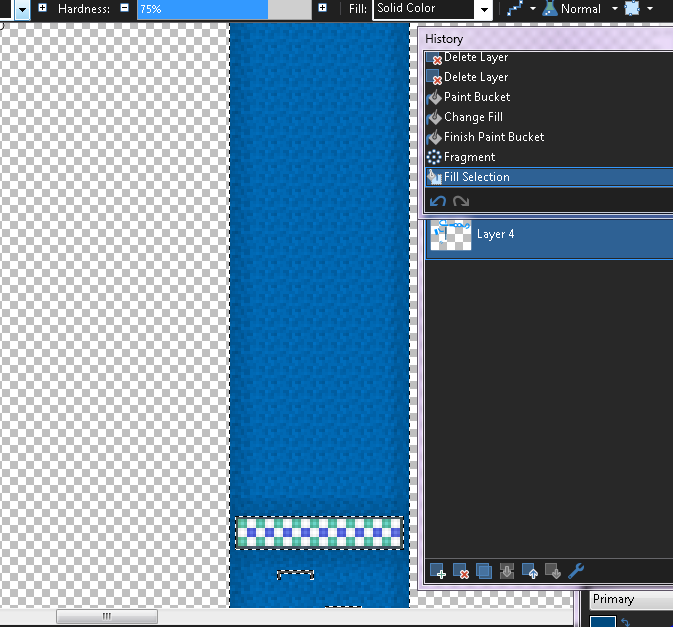
4- Pick the paint bucket tool, pick "Confetti" and fill the zone with that.
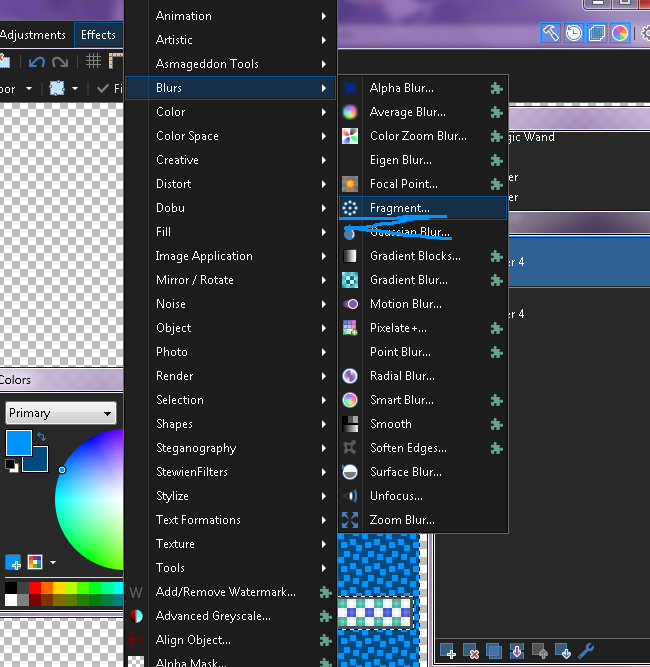
5- Go to effects > Blurs > Fragment.
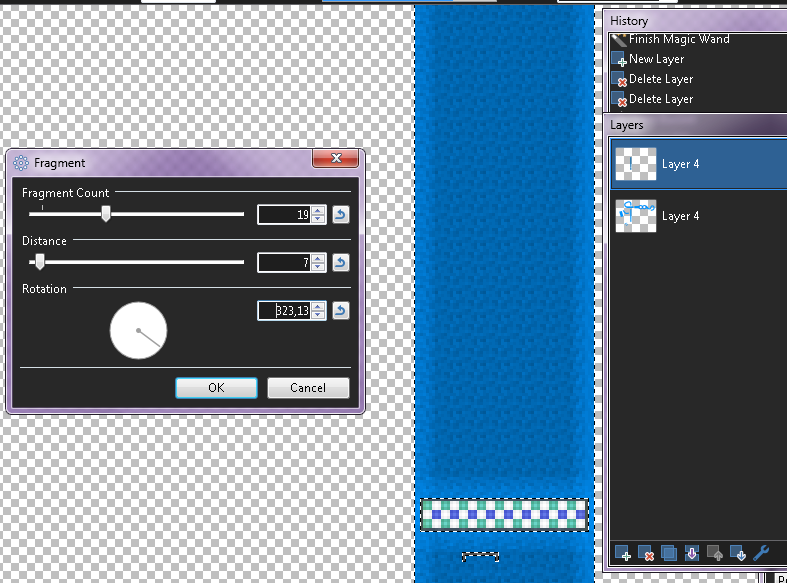
6- Set the distance and frames as your preference and apply the fragment effect.
7- Click on the base layer and make the zones darker.
8- Now you can finally end the selection.
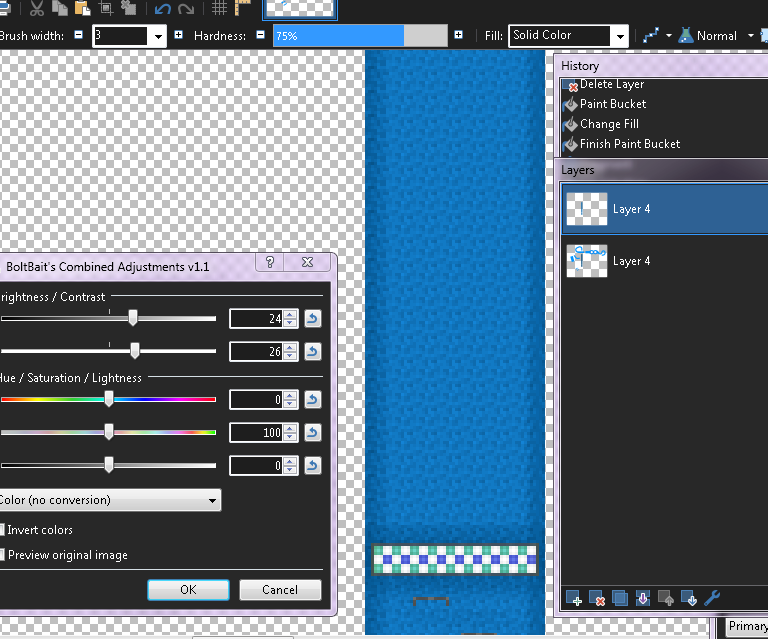
Extra: to highlight the details in the texture, you can apply light and constract settings as you can see here:
B- Using a Tileset or Already Existing Textures.
Probably the easier way to do textures in my opinion, because you just need a texture pattern so here we go.
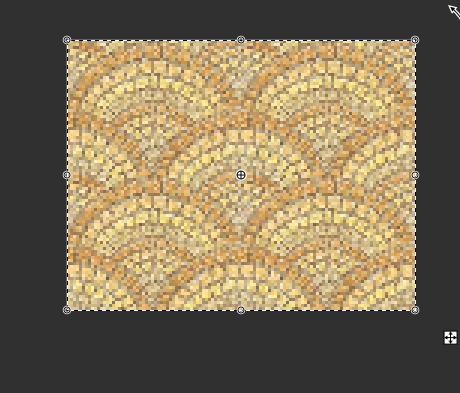
1- Pick the tile that you would like to use. Make sure that the image repeats the pattern appropriately.
2- Add a new layer
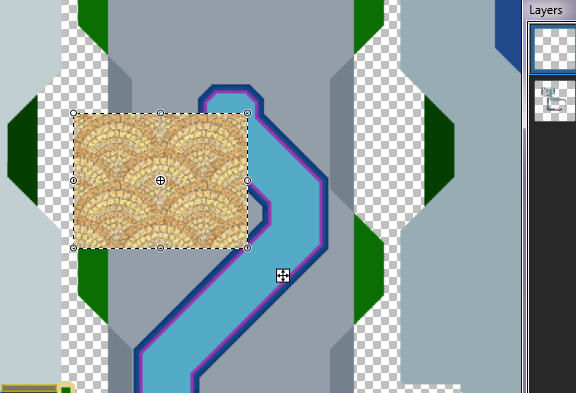
3- In that layer, copy and paste the tile until you have a square (or something similar to a square) that covers the whole part where the texture will be placed.
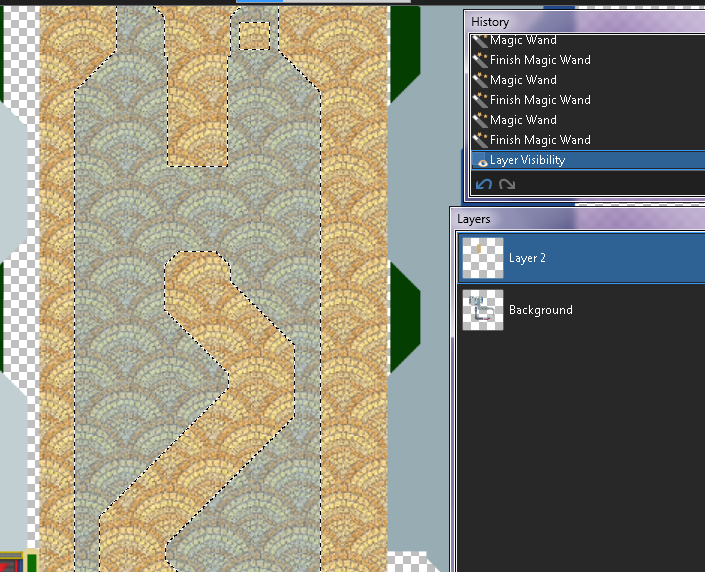
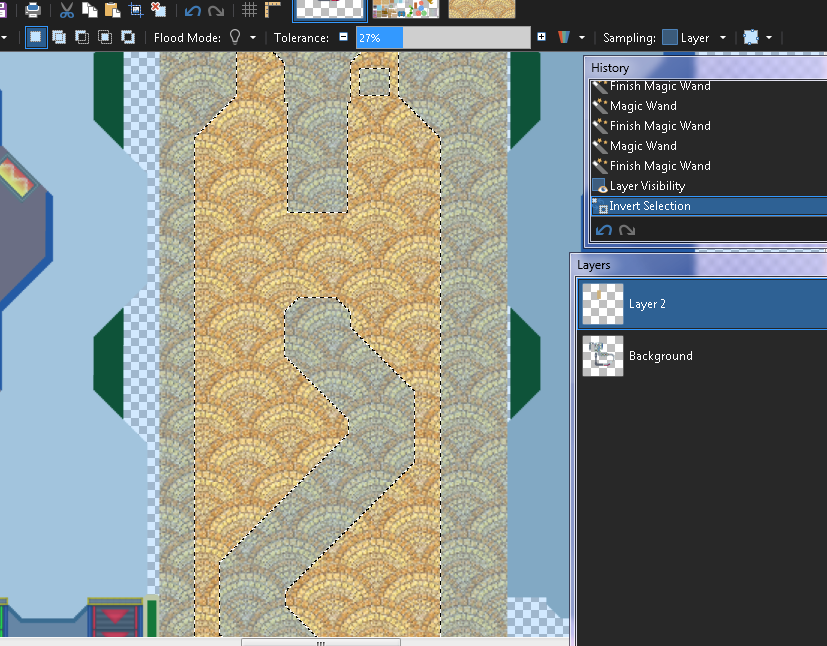
4- Go back to the first layer, and with magic wand tool select the part where the texture will be placed.
5- Now go back to the texture's layer and invert the selection (you can use CTRL + I or just looking for the option)
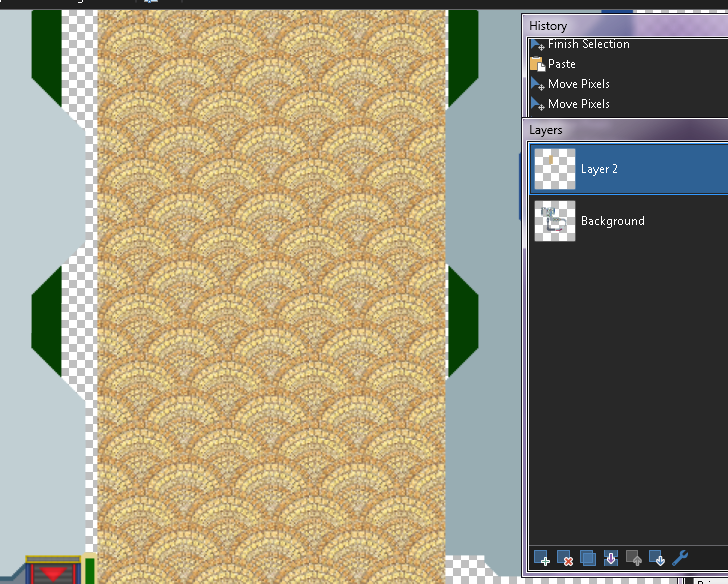
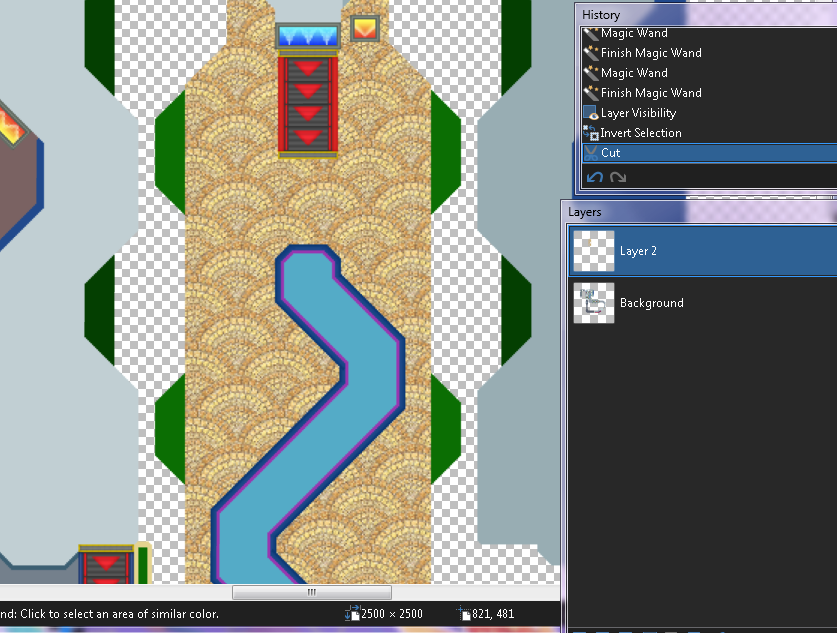
6- Cut that selection using CTRL + X (you can also delete it with eraser tool but with cutting it is a shortcut basically lol)
7- Flatten and enjoy :gamba:
Extra: Again, to highlight the details in the texture, you can apply light and constract settings just like in the past method.
Extra II: after you cut the excedent on the texture, you can make that texture gray (just go to adjustments and pick black & withe), go to layer settings and pick overlay blend to get the color that you already have in your track
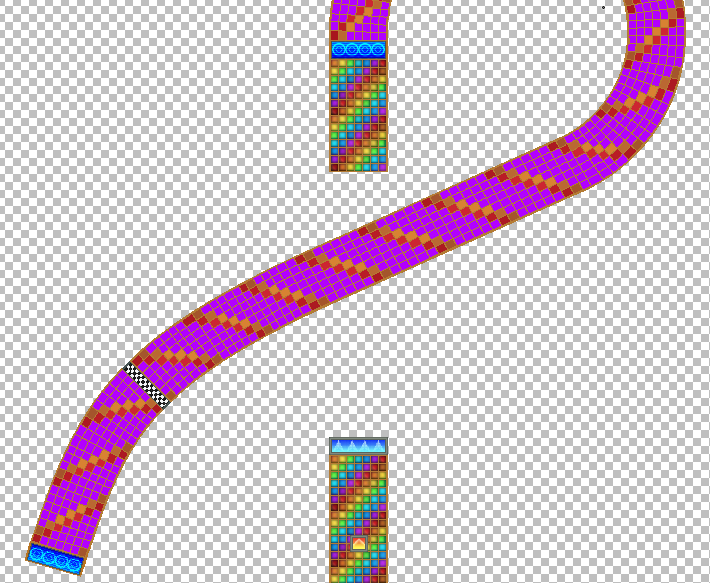
C- Do it by yourself
The most complicated now we're on the hardest way to do textures and its basically doing them by yourself, there's no much that i could explain because i rarely do a whole track doing textures by myself such as these kind of tiles:
As you can guess... is a headache but it worths.... sometimes
Said that, for another day i'll explain some basic stuff about lightning and shadows and how to do them (a least on my way)so cya fellas.
Textures & Shading
My favorite part of making tracks, texturing helps to define the idea that you have for any part of the track, making clear the kind of texture that the element has, obviously not everything will have the same texture and blah blah blah lets go to the point, today i'm gonna show some ways that i use for do textures
A- Using Confetti + Fragment Blur effect:
The first way that i learned to do textures, even if its a bit outdated, i still using it sometimes and it works really good when you learn how to use it correctly. So let me explain step by step how to do it.
1- Selecting the part where you'll apply the texture, easily you can use the magic wand tool and select it doing click on the zone.
Extra: if you need to select multiples zones you can selec the "add" section and each click that you just keep pressed control when you click.
2- Create a new layer WITHOUT end the selection btw.
3- Pick the base color of the place where you'll add the texture and pick as secondary color a darker tone of that one
4- Pick the paint bucket tool, pick "Confetti" and fill the zone with that.
5- Go to effects > Blurs > Fragment.
6- Set the distance and frames as your preference and apply the fragment effect.
7- Click on the base layer and make the zones darker.
8- Now you can finally end the selection.
Extra: to highlight the details in the texture, you can apply light and constract settings as you can see here:
B- Using a Tileset or Already Existing Textures.
Probably the easier way to do textures in my opinion, because you just need a texture pattern so here we go.
1- Pick the tile that you would like to use. Make sure that the image repeats the pattern appropriately.
2- Add a new layer
3- In that layer, copy and paste the tile until you have a square (or something similar to a square) that covers the whole part where the texture will be placed.
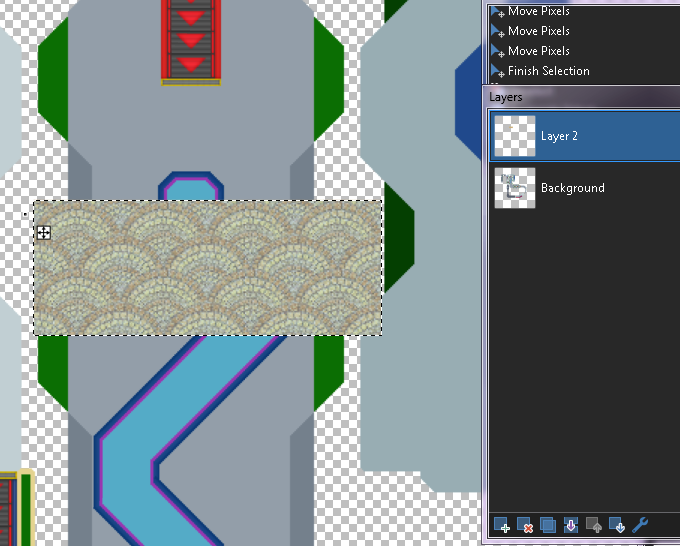
4- Go back to the first layer, and with magic wand tool select the part where the texture will be placed.
5- Now go back to the texture's layer and invert the selection (you can use CTRL + I or just looking for the option)
6- Cut that selection using CTRL + X (you can also delete it with eraser tool but with cutting it is a shortcut basically lol)
7- Flatten and enjoy :gamba:
Extra: Again, to highlight the details in the texture, you can apply light and constract settings just like in the past method.
Extra II: after you cut the excedent on the texture, you can make that texture gray (just go to adjustments and pick black & withe), go to layer settings and pick overlay blend to get the color that you already have in your track
C- Do it by yourself
The most complicated now we're on the hardest way to do textures and its basically doing them by yourself, there's no much that i could explain because i rarely do a whole track doing textures by myself such as these kind of tiles:
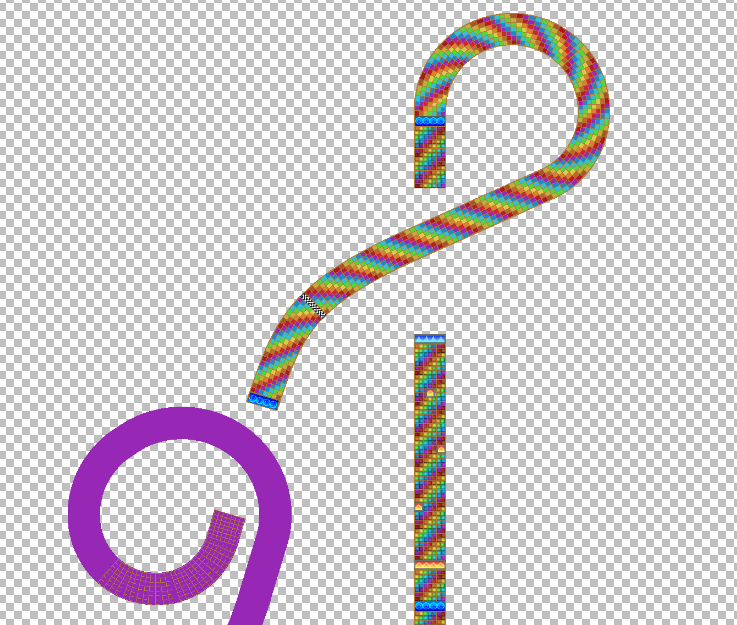
As you can guess... is a headache but it worths.... sometimes
Said that, for another day i'll explain some basic stuff about lightning and shadows and how to do them (a least on my way)so cya fellas.
 2
2 221
221On 2024-01-15 at 12:39:35
How do you create half pipes cus im gonna remake wii tracks pretty soon
On 2025-04-03 at 04:18:31
Guess who remembered the existence of this topic..... So since i got some free time, i can continue with this topic (ngl i almost deleted it and pretended it never existed lmao)
Anyways... let's continue!! Lightning and shadows
Well i dont have a exactly way of shading because it'll always depend of what i want to do on each track, obviusly ain't something that i do randomly ... a least on my actual tracks, but still something that i still polishing so this time this won't be a pretty accurated tutorial lol. But don't worry, i'll show you some of the factors i consider while shading tracks.
Generallly i apply shadings in two ways, drawing lines, outlines or circles, and i just play with the layers and the blending modes. Or if i don't want to work so much, i just play with the colors and try to make a noticeable gap between both, it can work as light or shadow as well.
1- Make pretty noticeable the gap between driveable and not driveable parts of the track.
With the image itself i explain almost everything lol, so as you can see i aply the same concept that mk7 minimaps, where there's a clear difference between driveable and not driveable parts. (This also helps a lot if you're a lazy walls maker like me, so with making that gap you'll save some time lol)
2- Colors Choice
This is kinda complicated to explain but... i have images so it could help :gamba:
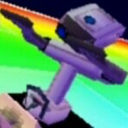
This is a somewhat subjective topic since it'll depend on what you want to apply on the track, normally i recommend using colors in a harmonious way and not clarify the same color based on adding black or withe, as well in many cases you'll not necessarily use the color you had in mind, to explain this i'll give a brief summary of what color theory is based on one of my favorite games (aka F-Zero)
As you can see.. there's a colorful-ish rainbow road on the f-zero screenshot, above you can see a color palette of not so saturated... almost gray while below you can see a palette a little more colorful...... Would you believe me if i told you that the colors above are the same as below? No i'm not crazy (well.....) the meegik here is because the background, as the background is darker, it makes these colors look more vivid, so to speak, unlike the palette above, which has a lighter background that makes the colors look more grayish and dull.
Said that, you can take that point in consideration while picking colors for your tracks, it'll help a lot when you have to add shades, because sometimes you dont need a kind of blur, or another hard effect to give shading effect, with just different colors you can.
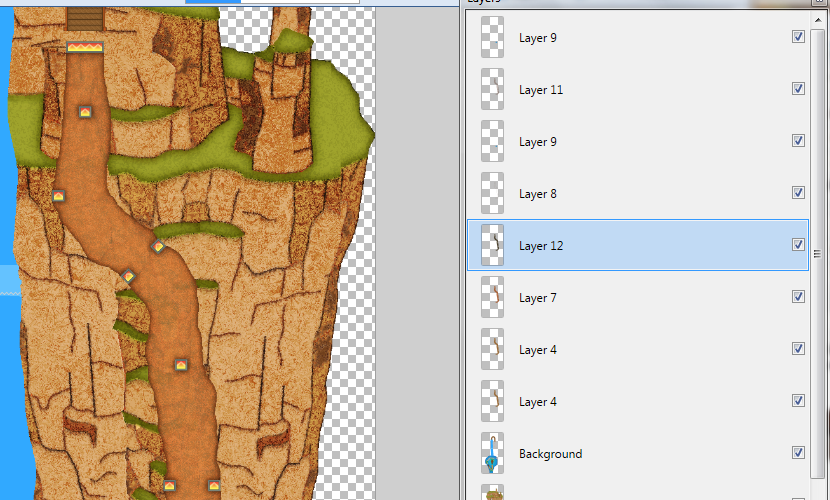
By example, with just 4 colors, you can see that this is a kind of relief, impying that the lighter color is the highest points and the darker ones are the low ones, even though they all have the same gray color for rocks (actually is a not very saturated blue), but you can notice the difference and it gives t he sensation of relief because of a (almost) right choice of colors.
Soo, taking chance that i'm still talking about colors, there's a small trick to make a harmonious color palette.
1- Pick the colors
2- Create a new layer
3- Fill the layer with a color in general (on my case i picked teal blue bc my fav color lol)
4- Low the opacity of that layer until you feel that each color has that kind of harmony (as you can see on the example)
Extra- You can try some blending mode of the layers to get some different palettes, so have fun!!
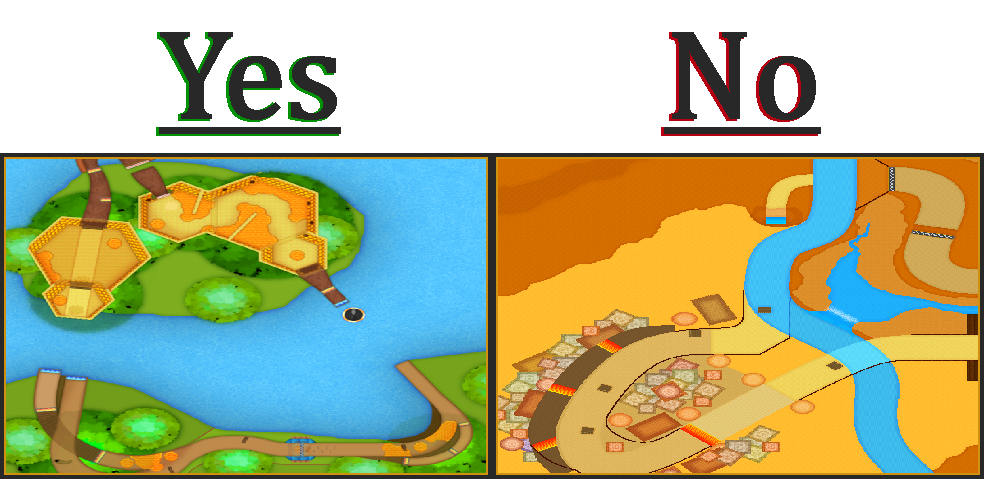
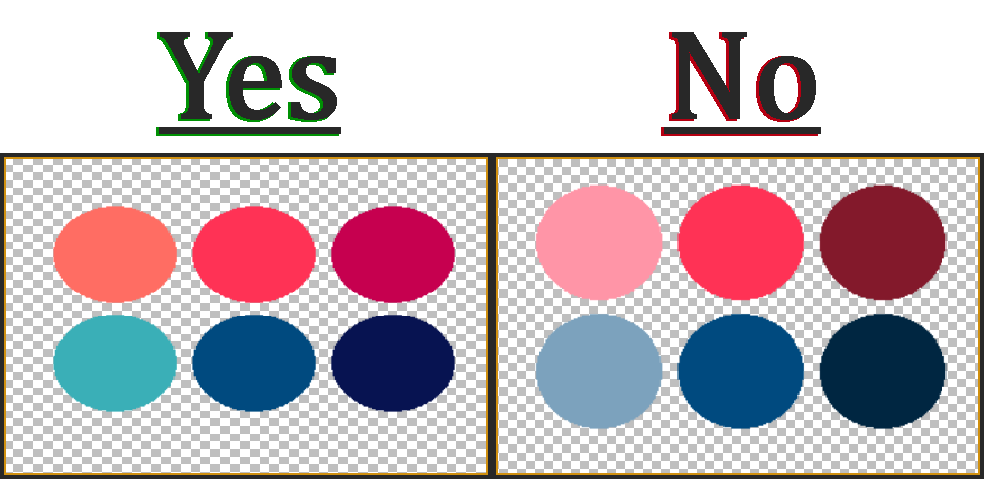
So to almost end, this is what i mean about picking harmonious colors instead just the same color but lighter or darker. First of all, there are the palettes that i'll use for this example (the pink ones)
Sooo here i go
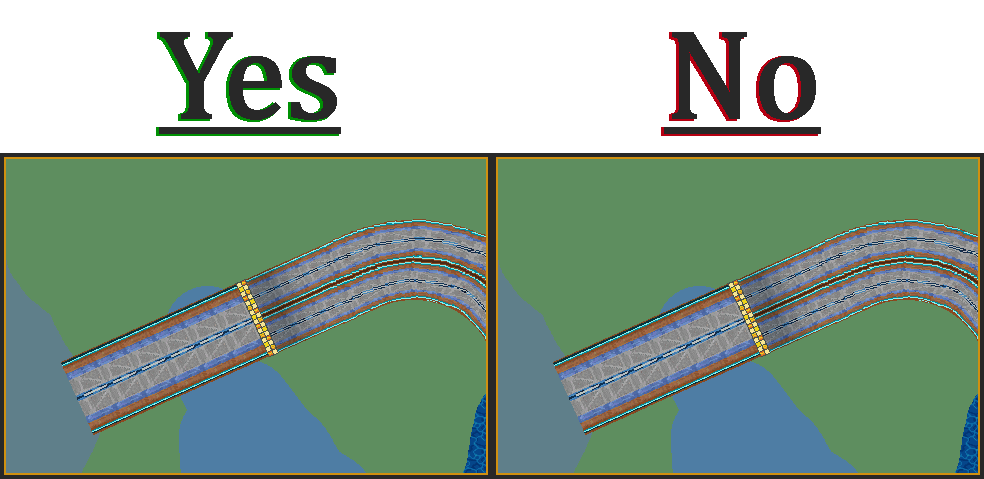
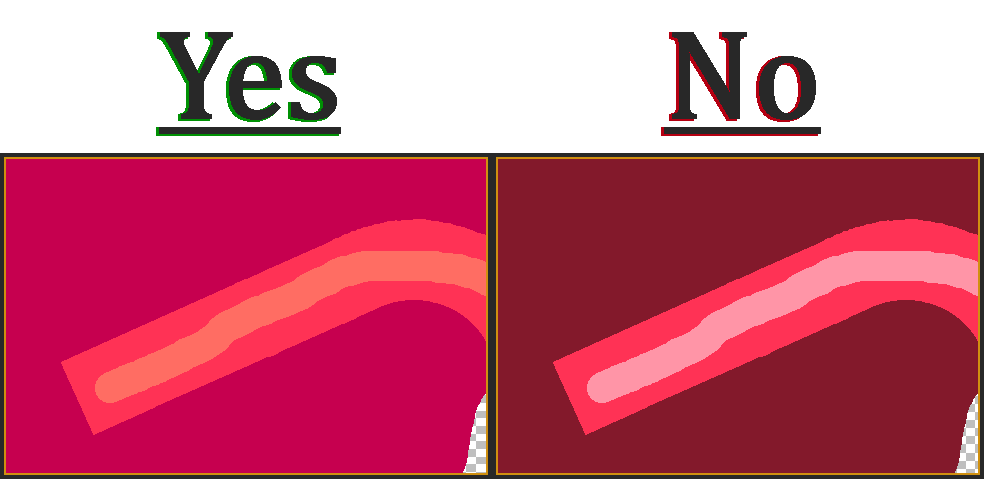
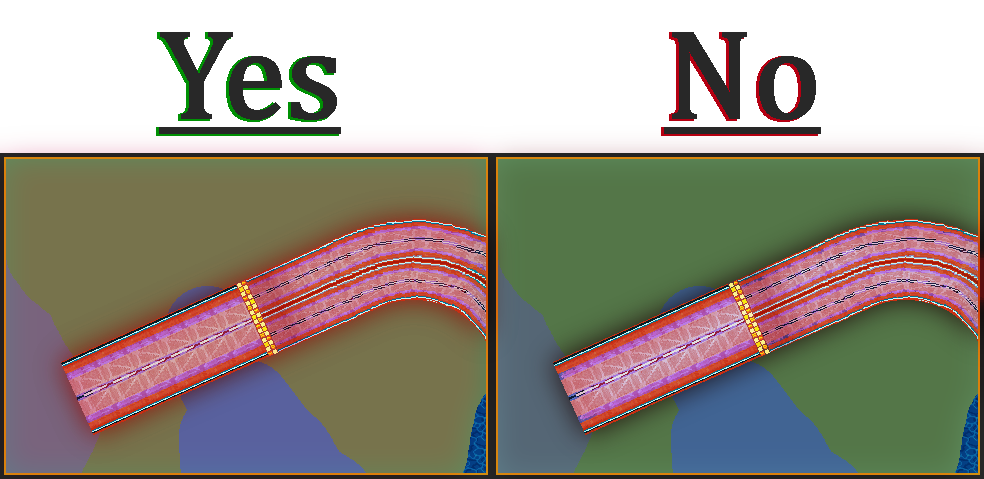
Btw i forgot to say that ignore the "Yes" and "no"... I just forgot to remove them because too lazy to do it lol, anyways you can clearly see the difference, As i said at the start, this is a somewhat subjective topic since it'll depend on what you want to apply on the track. By one hand you can add colors to have this kind of ambient light (or it looks like it has fog tbf), as well that you can add colors to realise any area. I generally recomend the firt one because you have softer results so are easier to modify compared with the second one, i'm not saying that one is better than the other because both ways can work if you apply them properly.
Said that, i can finish saying that these are the points that i take in consideration when i have to apply shadows in a track, still being something that i'm trying to polish as you all can notice but i feel this info can help to whoever is interested.
Btw any kind of topic that you guys would like that i talk about, feel free to stf-... jkjk feel free to say it lol, see ya next decade or when i remember that i created this topic again lol.
Anyways... let's continue!! Lightning and shadows
Well i dont have a exactly way of shading because it'll always depend of what i want to do on each track, obviusly ain't something that i do randomly ... a least on my actual tracks, but still something that i still polishing so this time this won't be a pretty accurated tutorial lol. But don't worry, i'll show you some of the factors i consider while shading tracks.
Generallly i apply shadings in two ways, drawing lines, outlines or circles, and i just play with the layers and the blending modes. Or if i don't want to work so much, i just play with the colors and try to make a noticeable gap between both, it can work as light or shadow as well.
1- Make pretty noticeable the gap between driveable and not driveable parts of the track.
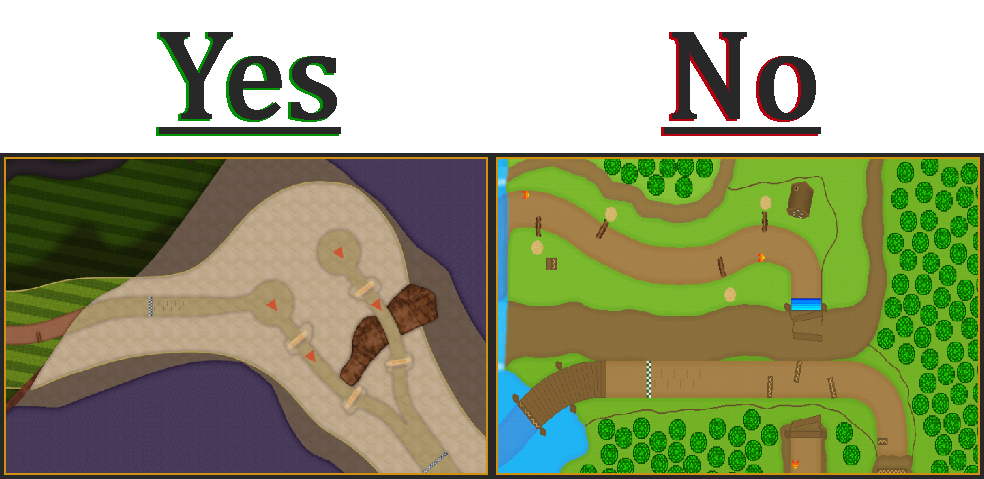
With the image itself i explain almost everything lol, so as you can see i aply the same concept that mk7 minimaps, where there's a clear difference between driveable and not driveable parts. (This also helps a lot if you're a lazy walls maker like me, so with making that gap you'll save some time lol)
2- Colors Choice
This is kinda complicated to explain but... i have images so it could help :gamba:
This is a somewhat subjective topic since it'll depend on what you want to apply on the track, normally i recommend using colors in a harmonious way and not clarify the same color based on adding black or withe, as well in many cases you'll not necessarily use the color you had in mind, to explain this i'll give a brief summary of what color theory is based on one of my favorite games (aka F-Zero)
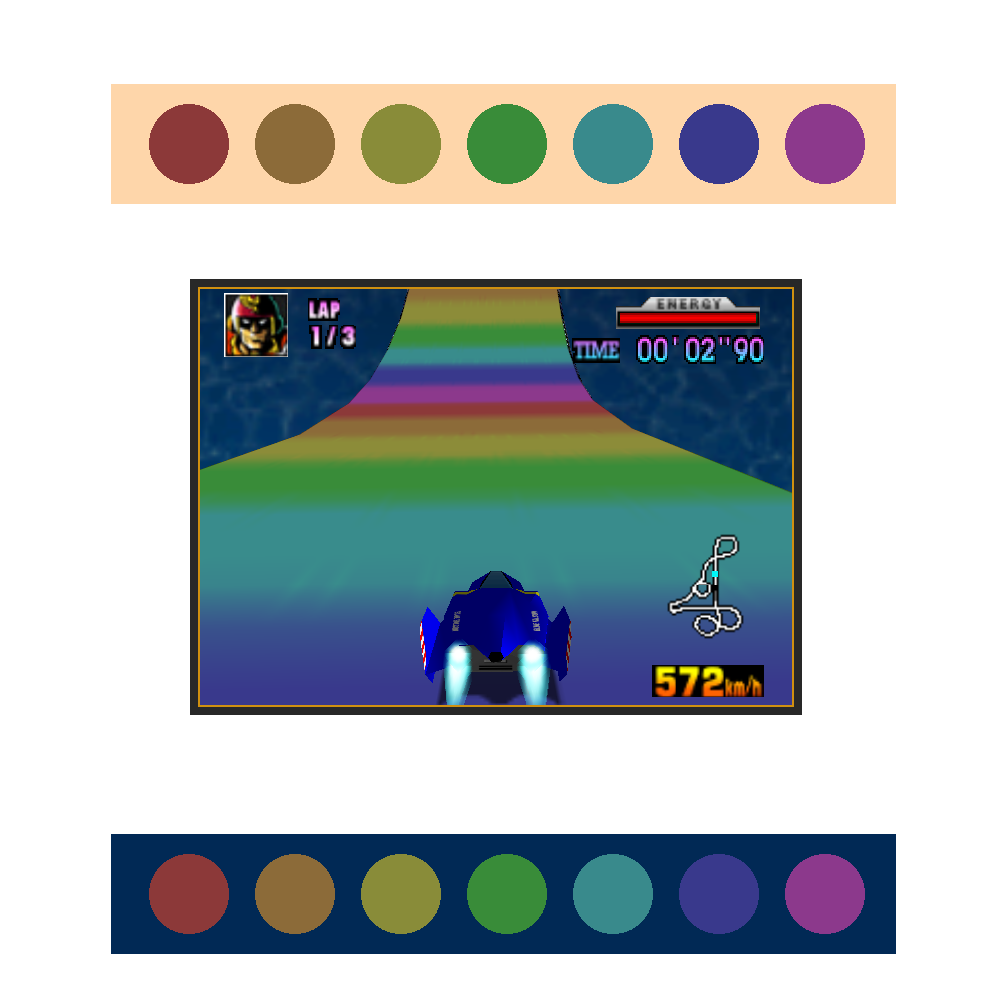
As you can see.. there's a colorful-ish rainbow road on the f-zero screenshot, above you can see a color palette of not so saturated... almost gray while below you can see a palette a little more colorful...... Would you believe me if i told you that the colors above are the same as below? No i'm not crazy (well.....) the meegik here is because the background, as the background is darker, it makes these colors look more vivid, so to speak, unlike the palette above, which has a lighter background that makes the colors look more grayish and dull.
Said that, you can take that point in consideration while picking colors for your tracks, it'll help a lot when you have to add shades, because sometimes you dont need a kind of blur, or another hard effect to give shading effect, with just different colors you can.
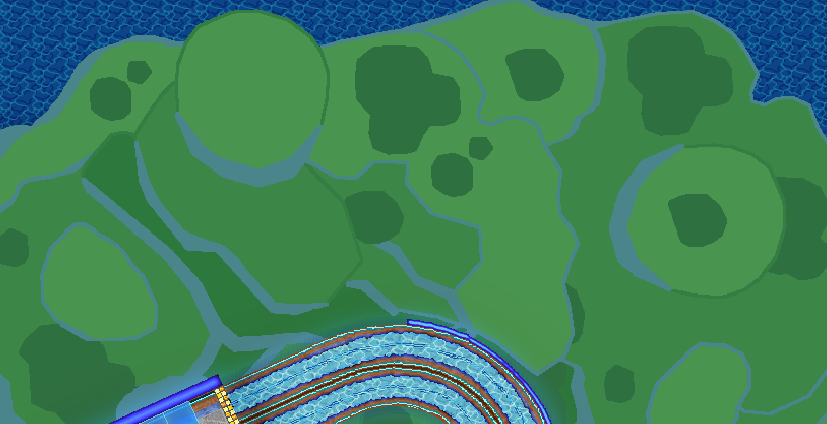
By example, with just 4 colors, you can see that this is a kind of relief, impying that the lighter color is the highest points and the darker ones are the low ones, even though they all have the same gray color for rocks (actually is a not very saturated blue), but you can notice the difference and it gives t he sensation of relief because of a (almost) right choice of colors.
Soo, taking chance that i'm still talking about colors, there's a small trick to make a harmonious color palette.
1- Pick the colors
2- Create a new layer
3- Fill the layer with a color in general (on my case i picked teal blue bc my fav color lol)
4- Low the opacity of that layer until you feel that each color has that kind of harmony (as you can see on the example)
Extra- You can try some blending mode of the layers to get some different palettes, so have fun!!

So to almost end, this is what i mean about picking harmonious colors instead just the same color but lighter or darker. First of all, there are the palettes that i'll use for this example (the pink ones)
Sooo here i go
Btw i forgot to say that ignore the "Yes" and "no"... I just forgot to remove them because too lazy to do it lol, anyways you can clearly see the difference, As i said at the start, this is a somewhat subjective topic since it'll depend on what you want to apply on the track. By one hand you can add colors to have this kind of ambient light (or it looks like it has fog tbf), as well that you can add colors to realise any area. I generally recomend the firt one because you have softer results so are easier to modify compared with the second one, i'm not saying that one is better than the other because both ways can work if you apply them properly.
Said that, i can finish saying that these are the points that i take in consideration when i have to apply shadows in a track, still being something that i'm trying to polish as you all can notice but i feel this info can help to whoever is interested.
Btw any kind of topic that you guys would like that i talk about, feel free to stf-... jkjk feel free to say it lol, see ya next decade or when i remember that i created this topic again lol.
3On 2025-04-03 at 04:22:03
How do you create half pipes cus im gonna remake wii tracks pretty soon
Jumps, teleports and boost pannels.... Lets pretend that i answered this a lot of time ago :genius:
On 2025-04-03 at 07:38:20
Wat da hellll Big Red
 1
1On 2025-04-03 at 08:56:16
Wat da hellll Big Red
pink ass red
1On 2025-04-16 at 08:31:26
First of all... Happy New Year qlonas :gamba:, second yep its been a while but lets say that i forget for a while that i did this topic lmao... now yep lets go
My favorite part of making tracks, texturing helps to define the idea that you have for any part of the track, making clear the kind of texture that the element has, obviously not everything will have the same texture and blah blah blah lets go to the point, today i'm gonna show some ways that i use for do textures
A- Using Confetti + Fragment Blur effect:
The first way that i learned to do textures, even if its a bit outdated, i still using it sometimes and it works really good when you learn how to use it correctly. So let me explain step by step how to do it.
1- Selecting the part where you'll apply the texture, easily you can use the magic wand tool and select it doing click on the zone.
Extra: if you need to select multiples zones you can selec the "add" section and each click that you just keep pressed control when you click.
2- Create a new layer WITHOUT end the selection btw.
3- Pick the base color of the place where you'll add the texture and pick as secondary color a darker tone of that one
4- Pick the paint bucket tool, pick "Confetti" and fill the zone with that.
5- Go to effects > Blurs > Fragment.
6- Set the distance and frames as your preference and apply the fragment effect.
7- Click on the base layer and make the zones darker.
8- Now you can finally end the selection.
Extra: to highlight the details in the texture, you can apply light and constract settings as you can see here:
B- Using a Tileset or Already Existing Textures.
Probably the easier way to do textures in my opinion, because you just need a texture pattern so here we go.
1- Pick the tile that you would like to use. Make sure that the image repeats the pattern appropriately.
2- Add a new layer
3- In that layer, copy and paste the tile until you have a square (or something similar to a square) that covers the whole part where the texture will be placed.
4- Go back to the first layer, and with magic wand tool select the part where the texture will be placed.
5- Now go back to the texture's layer and invert the selection (you can use CTRL + I or just looking for the option)
6- Cut that selection using CTRL + X (you can also delete it with eraser tool but with cutting it is a shortcut basically lol)
7- Flatten and enjoy :gamba:
Extra: Again, to highlight the details in the texture, you can apply light and constract settings just like in the past method.
Extra II: after you cut the excedent on the texture, you can make that texture gray (just go to adjustments and pick black & withe), go to layer settings and pick overlay blend to get the color that you already have in your track
C- Do it by yourself
The most complicated now we're on the hardest way to do textures and its basically doing them by yourself, there's no much that i could explain because i rarely do a whole track doing textures by myself such as these kind of tiles:
As you can guess... is a headache but it worths.... sometimes
Said that, for another day i'll explain some basic stuff about lightning and shadows and how to do them (a least on my way)so cya fellas.
Happy New Year!Textures & Shading
My favorite part of making tracks, texturing helps to define the idea that you have for any part of the track, making clear the kind of texture that the element has, obviously not everything will have the same texture and blah blah blah lets go to the point, today i'm gonna show some ways that i use for do textures
A- Using Confetti + Fragment Blur effect:
The first way that i learned to do textures, even if its a bit outdated, i still using it sometimes and it works really good when you learn how to use it correctly. So let me explain step by step how to do it.
1- Selecting the part where you'll apply the texture, easily you can use the magic wand tool and select it doing click on the zone.
Extra: if you need to select multiples zones you can selec the "add" section and each click that you just keep pressed control when you click.
2- Create a new layer WITHOUT end the selection btw.
3- Pick the base color of the place where you'll add the texture and pick as secondary color a darker tone of that one
4- Pick the paint bucket tool, pick "Confetti" and fill the zone with that.
5- Go to effects > Blurs > Fragment.
6- Set the distance and frames as your preference and apply the fragment effect.
7- Click on the base layer and make the zones darker.
8- Now you can finally end the selection.
Extra: to highlight the details in the texture, you can apply light and constract settings as you can see here:
B- Using a Tileset or Already Existing Textures.
Probably the easier way to do textures in my opinion, because you just need a texture pattern so here we go.
1- Pick the tile that you would like to use. Make sure that the image repeats the pattern appropriately.
2- Add a new layer
3- In that layer, copy and paste the tile until you have a square (or something similar to a square) that covers the whole part where the texture will be placed.
4- Go back to the first layer, and with magic wand tool select the part where the texture will be placed.
5- Now go back to the texture's layer and invert the selection (you can use CTRL + I or just looking for the option)
6- Cut that selection using CTRL + X (you can also delete it with eraser tool but with cutting it is a shortcut basically lol)
7- Flatten and enjoy :gamba:
Extra: Again, to highlight the details in the texture, you can apply light and constract settings just like in the past method.
Extra II: after you cut the excedent on the texture, you can make that texture gray (just go to adjustments and pick black & withe), go to layer settings and pick overlay blend to get the color that you already have in your track
C- Do it by yourself
The most complicated now we're on the hardest way to do textures and its basically doing them by yourself, there's no much that i could explain because i rarely do a whole track doing textures by myself such as these kind of tiles:
As you can guess... is a headache but it worths.... sometimes
Said that, for another day i'll explain some basic stuff about lightning and shadows and how to do them (a least on my way)so cya fellas.
On 2025-04-20 at 03:35:59
i think adding lighting and shading will be hard for me.
Page: 1